Eventually, I'll actually have printable card you can print and organize, but for now I'll just put the content of each card on here!
Overview card 1
Theme: Snow
Shape: circle
Color: white
Letter: S
Number: 0 (zero)
Concept: same/different
Verse: psalms 139:14
Science: Every snowflake is different just like me!
Theme card: snow
Monday:read snow poem (from Internet search), discuss that snow comes in winter
Tuesday: play with shaving cream on table (pretend its snow)
Wednesday: make snow scene with white paint on black or navy paper. Thumbprints are snow flakes
Thursday: make snow playdoh (mix white glitter into white playdoh)
Friday: make waterless snow globes (hot glue bristle trees to jar lids, put a little fake snow in jar, close lid, display jar upside down)
Number card: 0
Monday: discuss number
Tuesday: write 0 in the shavingcream snow
Wednesday: 0 coloring page*
thursday: 0 writing worksheet*
Friday: 0 writing on lined paper
Shape card: Circle
Monday: introduce shape, sing song about shape (find song online)
Tuesday: draw shape in shaving cream
Wednesday: collage, glue circles in shape of a snowflake
Thursday: circle scavenger hunt, look for circles in environment, and/or place circles to be found around house
Friday: circle worksheet
Verse card: ps 139:14
Monday: recite verse
Tuesday: Verse coloring page (can be found online)
Wednesday: snowflakes verse scramble (write each word or a couple words on snowflake and put in proper order)
Thursday: snowflake verse scramble
Friday: large snow scene or banner with the snowflakes from the verse scramble permanently attached together.
Concept: same/ different
Monday: talk about the meaning
Tuesday: worksheet
Wednesday: have objects or pics to be compared, place same objects in one container or pile, different in another.
Thursday: worksheet
Friday: same activity as Wednesday
Letter: s
Monday: introduce letter, sing song about letter, trace with finger
Tuesday: write letter in shaving cream on table
Wednesday: iPad app (pocket phonics)
Thursday: writing page
Friday: coloring/writing page
Color: white
- remind how snow is white with all activities
- verbally spell white daily
- point out white things in the environment
- white scavenger hunt
Science card: every snowflake is different
- read books about snowflakes
- look at snowflake pics online (of actual snowflakes)
- we both make a snowflake by folding paper and making cuts then compare how they are different
- talk about how snowflakes are different and people are different too, read a book about someone who is different
I try to stagger the activities we do. For example do a sitting activity then a crafty/fun activity then sitting activity. I also don't have to do everything I one sitting. On days we read books, we might wait til bed time, for example.


Sunday, December 4, 2011
Homeschooling preschool: How I plan
Thanks for starting with me on our homeschooling journey! As i mentioned in my last post, I'm really only committed to homeschooling until kindergarten. Before I share with you the week's plans, I thought I'd share a general overview of how I make my plans.
First up, how I organize my plans.
I have chosen to keep my plans on note cards in one of those note card boxes. For each week there are 9 cards. The first is my starting place. On it is the week number (1-52), the theme for the week, and {at this point} shape, color, letter, number, concept, Bible memory verse, and science concept. That gives me a general overview for the week. Each other card has a category on it. As we go along the categories on the cards will change, but this is the basis for a while. I was having trouble pinpointing what exactly to call the concepts. They are basically things like over/under, longest/shortest, etc. They will get more complex as we go along, but for now, she needs to learn these things. Science is not necessarily the science we think of in a strict sence. It can be anything from an actual science thing to the fact that there are generations in a family. Science is one simple concept that correlates with the theme. The first week for example is that every snowflake is different, and our theme is snow.
Secondly, my method of planning.
After I have my first card hammered down, I create a card for each of the categories. There is a card for the theme, shape, color, verse, letter, etc. On each of these cards I write the days Monday-Friday. Beside each day I write the planned activity for the day. Emphasis on PLANNED! I don't want her to get bored with learning. I feel like the most important thing I can do to get her ready for school (weather at home or not) is to make her excited to learn. If she gets restless, and doesn't want to do anything else, we will stop or even just change focus. If it doesn't all get done, then it's totally ok! Some cards don't have an activity for each day, and some activities will be repeated.
You'll be able to understand this as you look through my plans for the week, I just wanted to explain a little of the meathod to the madness!
Homeschooling: How I've Decided to Teach Reading
Im not 100% sure that we will homeschool, I'm still praying about that one, but I am doing it for preschool. There's two reasons for this. 1) I want to make sure Lilly can read before kindergarten. 2) I want to practice homeschooling before it actually counts. I'm a little worried about taking on the sole responsibility of her learning. I do KNOW that Lilly would get a better education (at least through 3 grade) if she were taught by me. Our school system just isn't that great. I doubt we would homeschool through high school, I just want her to have a super strong foundation. That said, I'm not sure it would benefit her socially to be homeschooled. She already has tendencies to be shy, so I don't really want to reinforce that. All things we are praying about! It's such a HUGE decision!
Since I have decided, to at least teach her how to read, I knew I needed a good method. We got an app on my iPad that she loves, and has already started reading some words just in her usual play. In the app, you can sign up for an email that explains the best way to teach kids to read. It is backed by research and is apparently the method used in many countries in Europe. (the app is called Pocket Phonics)The whole goal of this is to get kids reading earlier, not just in age, but also during the process of learning the letters. The meathod basically has two components.
1) Initially only call the letters by their sounds. The reasoning for this is that it's less information to have to remember. This was like a light bulb moment for me! It totally makes sence. They will of course learn their letter names, that's not actually that hard to retain. And I'm not super strict about this one. I do say the name sometimes, but when I discuss the letters I emphasize "this letter sounds like..." so that she knows there's a name, we just only learn the sound.
2) Don't teach in the abcd... Order. We teach in groupings of letters that will form words early on. this way, she will reach the achievement of reading almost from the beginning. Our first grouping is A,S,T,N,P,I.
This is so different than how they teach in schools, and pretty different than how I was taught. I am teaching her all six letters at once via the app, but I'm emphasizing one letter a week. This is mostly to help with writing practice. I very much feel like phonics is the absolute best way to learn. I hate whole language learning, it just leaves too many kids behind. I am going to be emphasizing good penmanship while she learns how to write, I just don't think schools focus on that enough!
I think you'll better understand this meathod as I post our lesson plans this week. It's slightly unconventional, but I think it's what will work best for my child, and that's what's important!
Photo shoot day!
Back in October I had a fall photo day, and one client's photos were just not good. It was a mix of too high ISO, poor lighting, and a little girl that just really wanted to play on the nearby playground. It was a deadly combination! So I offered them 50% off of a family shoot, just because imlike that. I felt terrible for the poor quality of the pics. We got together today, and the pics turned out great! Like seriously, I think it's one of the best shoots I've had!


I also took the opportunity to get a few shots of Lilly before they came, and OMG love! They came out so well, I'm so glad she cooperated with me!


I also took the opportunity to get a few shots of Lilly before they came, and OMG love! They came out so well, I'm so glad she cooperated with me!


Friday, December 2, 2011
Green Tip: Super Conditioning Hair Treatment
It wasn't too long ago that I had my hair done by someone who apparently had no clue what she was doing. My hair went through 5 processes to get it a color that looked somewhat like a natural color. My hair literally felt like Barbie doll hair it was so fried. I knew I had to do my best to repair it, though it would never get back to its original healthier state. I went to the hair product isle at the local super department store and decided to try a Panteen hair repair product that had 5 vials of conditioner. It worked pretty well, but was getting a little expensive.
Here comes my natural alternative that works BETTER than the chemical laden store brands. Coconut oil, the unrefined kind. I'm serious, this stuff is amazing! It has antibacterial, anti fungal, and super moisturizing properties. It's a little miracle in a jar. Knowing all the goodness this stuff does, I had to see what, if anything, it would do for my hair. The results were amazing! My hair became completely manageable, and all the split ends looked like they had disappeared.
So, I'm gonna let you in on this miracle process! It's super easy, you're going to love it!
Step 1: Slather the stuff in your hair, be sure to get it on every strand, especially the tips. Don't worry, you will only look like the dorky kid in school that never washed her hair for only a night, I PROMISE!
Step 2: Comb through your hair to make sure it's evenly coated. At this point you may want to twist it up into a bun. That's totally up to you.
Step 3: Go to sleep, enjoy smelling like a coconut pie.
Step 4: Wash that stuff right out of your hair! One wash will most likely get it out, but you may need to do the whole rinse and repeat thing. If you repeat, put conditioner in your hair before getting out. If you don't, you might just be able to get by without the conditioner.
Step 5: Do whatever you do to let your hair dry. Style like normal and enjoy your beautiful hair!
When you get out of the shower you should totally use the oil for your moisturizer! Since it's 100% natural, your body will absorb the goodness, way better than it will from a chemical moisturizer from the store! The coconut smell will go away after a bit, so don't worry about smelling like a pie all day.
Hope it works as well for you as it has for me!
Thursday, December 1, 2011
Pinterest Christmas Decor Ideas
I just love this time of year! There are so many wonderful crafts to be made! Thanks to pinterest, my list is a mile long this year! Unfortunately, we are at the point in our remodel that I had to lose my desk to make room for the doorway to the addition. It's a sacrifice I'm willing to make because in about 2 weeks I'm going to have my dream craft room. oh the joy!! There are few things I've been doing. I've been crocheting like a mad woman, and doing little things. But, since I don't actually have the space to do a lot, I thought I'd show you some of the things from pinterest that have been getting my crafty juices flowing! {make sure you're following me on Pinterest!!}
 |
I know, I know, this is more of a Fall thing, but how cute would this wreath from Etsy be in Christmas colors? (sorry, the link to the item is no good now, but I *think* itzfitz made it) It looks ridiculously easy to make (and definitely would be less than the $40 price tag). I'm thinking it would be adorable to have a snowman or santa instead of the owl, and snowflakes and/or poinsettias instead of the flowers. {I'm hoping to do a tutorial on making my Christmas version soon!}

 These waterless snow globes from Sweet Something Design blog are rediculously easy, and so cute! They are a project I will be doing with Lilly for our snow unit next week! {We've started doing preschool homeschooling! I'll be posting my lesson plans each week, so watch for that!}
This is EASILY my favorite find on pinterest this year! I'll be making this, and putting it on a wall with a reindeer prints on either side. {I'll post a pic once I get them done!} Keeping with the silhouette theme, I'm thinking a silhouette print of a nativity scene would be awesome elsewhere! This idea comes to pinterest via Compulsive in Texas
I'm making a few of these trees from How to Nest For Less already! They have the tinsel, but I'm adding in some small ornaments too!
 |
Celesa
Tuesday, November 29, 2011
Tuesday Tip: Crochet Scrubbies Pattern
This tutorial was originally posted on my old lilly bunns blog!
I just love these scrubbies! They have so many different uses! I've made them bigger and use them as a baby rag, I scrub pots and pans, and even my face with them--never after using them on the pans of course. They are super easy and quick to make!
If you don't know how to crochet, you can buy these in my shop!
Yarn: Doesn't really matter, but it needs to be a worsted weight. I like cotton yarn (sugar and cream brand) for its softness and bright colors. Red heart super saver might be a little more abrasive.

Hook: G
Abreviations:
St: Stitch
Ch: Chain
SC: SC
Notes: This is made in one continuous ring, you can make bigger by adding increase rows. These don't need to be exact, but if you are a stickler for that kinda thing, you may want to use a stitch marker to note where the beginning of a row is.
Row 1: Ch 6 Slip St closed to form ring
Row2: 6 SC into ring. (6)
Row 3: 2 SC in each st around (12)
Row 4: *1 SC in next st, 2 SC in next st** repeat from *to ** 5 more times (18)
Row 5: *1 SC in next 2 st, 2 SC in next st** repeat from * to ** 5 more times (24)
Row 6: *1 SC in next 3 st, 2 SC in next st** repear from * to ** 5 more times (30)
Row 7: *1 sc in next 4 st, 2 SC in next st** repeat from* to ** 5 more times (36)
To finish: skip one stitch, slip stitch and tie off. This will make it to lie down more.
These will be about 3 inches in diameter.
I just love these scrubbies! They have so many different uses! I've made them bigger and use them as a baby rag, I scrub pots and pans, and even my face with them--never after using them on the pans of course. They are super easy and quick to make!
If you don't know how to crochet, you can buy these in my shop!
Yarn: Doesn't really matter, but it needs to be a worsted weight. I like cotton yarn (sugar and cream brand) for its softness and bright colors. Red heart super saver might be a little more abrasive.
Hook: G
Abreviations:
St: Stitch
Ch: Chain
SC: SC
Notes: This is made in one continuous ring, you can make bigger by adding increase rows. These don't need to be exact, but if you are a stickler for that kinda thing, you may want to use a stitch marker to note where the beginning of a row is.
Row 1: Ch 6 Slip St closed to form ring
Row2: 6 SC into ring. (6)
Row 3: 2 SC in each st around (12)
Row 4: *1 SC in next st, 2 SC in next st** repeat from *to ** 5 more times (18)
Row 5: *1 SC in next 2 st, 2 SC in next st** repeat from * to ** 5 more times (24)
Row 6: *1 SC in next 3 st, 2 SC in next st** repear from * to ** 5 more times (30)
Row 7: *1 sc in next 4 st, 2 SC in next st** repeat from* to ** 5 more times (36)
To finish: skip one stitch, slip stitch and tie off. This will make it to lie down more.
These will be about 3 inches in diameter.
Saturday, November 26, 2011
My Brother!
 |
| My Three Brothers (Joshua, Caleb, Samuel) |
 |
| His Wife :) |
3 Years ago on August 19, while I was visiting my family, we got a phone call that shook our world. The message said Caleb has been in an accident. The tough ex-marine-turned-sailor on the other end sounded as if he was crying. We knew it was serious. After finally getting in touch with someone to see what had happened (he was stationed with the Navy in Norfolk, VA at the time), we headed up that way. At the time all we knew was that he had dove into a pool, and now couldn't feel his legs. The surgical nurse at the hospital said if it was her kid, she'd go up there. So we all loaded up the car at about 9 pm and made the long drive from SC to norfolk.
We arrived there just as he was finishing up surgery. When he had dove into the pool, he hit the top of his head and his chin was forced down to his chest. the impact caused his C6 vertebra to break and a small piece press on his spinal chord. He is now paralyzed from the waist down.
He has some control of some of his abdominal muscles, and can move several toes on his right foot (these are things he's gained since the accident!) He still has a good bit of feeling in his legs, and is gaining more all the time. He's come such a long way since the accident!
This past June he married such a wonderful girl. She seriously fits right in with our family! We've all known her for quite some time, but just last year we were all reunited. She is so helpful and amazing, and I'm so glad I now have a sister! (ok, to be fair I have to sis-in-laws on my hubby's side, but I'm not close to them--something I've been praying for to change!) They sure got knocked-up fast, but it's all in God's timing! I'm so happy for them, and so glad that science has been able to make this happen for him!
As much as they get knocked all the time, our family would seriously be nowhere if it weren't for the VA hospital in Richmond VA. I also have to say that the PVA (paralyzed veterans of America) has been a tremendous support as well! We were even able to meet Richard Petty at an event in Charlotte because of his involvement with the PVA. For some southern kids that grew up watching races, it was a real honor! Please do whatever you can to support these organizations, and your troops!
Please keep my bubba and sissy in your prayers as they embark on this new chapter in their lives! They are building a house, now so that's adding to the stress!! God's really been laying on my heart to pray for Caleb's complete healing, so please be praying with me for that! Thanks for sharing in my excitement!!
- Celesa
Thursday, November 24, 2011
Happy Thanksgiving!
Man, this year has seriously flown by! There's just so much for me to be thankful for this year. I'm so blessed! This is just the short list, but here are a few things I'm the most thankful for this year!
1) A loving, almighty, God. It never ceases to amaze me just how deep Gods love for us goes. I am, of course, thankful for my salvation, but I'm almost even more so thankful that God just wants a relationship with me. It is because he wants that relationship that he grants us eternal life and even helps with our day to day living here on earth. He is truly amazing!!
2) Life. I'm so thankful for not only being alive, but having a life that is blessed. I'm so thankfull for all the people in my life. As I'm writing this, I'm even more thankful for my aunt, I'm so blessed to have her and tha k God for protecting her through her shooting.
3) My Family. I'm so blessed to have everyone from my husband and parents and extended family, to my precious daughter. I'm so happy to be the mom to such a wonderful girl! I'm also blessed that my family got a little larger this year! My brother married a wonderful girl that we've been friends with for years! I'm so fortunate to have my new sissy! This year I've Rowan closer to my inlaws and my family in my heart has expanded. Seriously, seriously thankful for family!
4) My church! I'm so thankful that God lead us from a mediocre church to a church of excellence. I'm honestly not sure if it's just because we are where God wants us, or the quality of the church, but the holy spirit just seems to dwell in the church we attend now, and it is so precious to me to be able to experienc that every time the doors open!
There's so, so much more for me to be thankful for this year, but these are the things that have affected my life the most this year.
I pray that your life be equally as blessed! Take the time to be thankfull today!
Celesa
Friday, November 18, 2011
My Latest Obsessions
I've got a problem. To me it's a really, really big problem. Ya see, I feel bad for thanksgiving. I mean, it's always getting put second to Christmas. Especially this year, stores are opening so early that people are just focused on their Christmas shopping. But that's really not my problem. My problem is the guilt I feel for joining in. I just can't fight it anymore! The draw of Christmas is just too hard to resist! It's time to indulge my latest obsessions!
I'm seriously obsessed with all the awesome things I can make to decorate my house for Christmas! I have a little problem, though! I don't have enough surfaces to put everything on! Even after the remodel is finished, I'm not sure we will have enough places for all the things I want to make! I've got a lot of planning to do!!
One of the things I'm most obsessed with are cones! There's paper mache cones, wooden cones, Styrofoam cones, paper covered cones, tinsel covered cones, fabric covered cones, cones made to look like trees, and cones made to look like santa, there's just so many things you can do with a cone! {woah! Sorry, I was channeling Bubba from Forrest Gump there for a second!} Seriously, though there are SO many things one can do! Here's just a few of my favorites!
Another thing are wreaths! Little else can make the outside of your house more inviting than a wreath! There's so many cute ones! I can't decide which I want to make! I'm leaning toward trying to make one with a nativity scene in the middle. But these here are just so dang cute! Hmmm, maybe I could just have a few and change them out each week...Maybe?
Another new tradition I'm definitely starting this year is an advent calendar! I've just got to come up with the perfect one to make! I really love the idea of counting down the days with some education for my sweet daughter! Here are a few tutorials I've seen for them, but none I've fallen head over heals in love with, yet.
Well, I hope you've been a little inspired today! I'm totally having a fit wanting to get to the store for supplies to make some of this fabulousness!
I'm seriously obsessed with all the awesome things I can make to decorate my house for Christmas! I have a little problem, though! I don't have enough surfaces to put everything on! Even after the remodel is finished, I'm not sure we will have enough places for all the things I want to make! I've got a lot of planning to do!!
One of the things I'm most obsessed with are cones! There's paper mache cones, wooden cones, Styrofoam cones, paper covered cones, tinsel covered cones, fabric covered cones, cones made to look like trees, and cones made to look like santa, there's just so many things you can do with a cone! {woah! Sorry, I was channeling Bubba from Forrest Gump there for a second!} Seriously, though there are SO many things one can do! Here's just a few of my favorites!
|
|


Another thing are wreaths! Little else can make the outside of your house more inviting than a wreath! There's so many cute ones! I can't decide which I want to make! I'm leaning toward trying to make one with a nativity scene in the middle. But these here are just so dang cute! Hmmm, maybe I could just have a few and change them out each week...Maybe?
 |
| This one is BEAUTIFUL! From Whipperberry |
| How amazing is this one from Miss Fancy Pants? |
Another new tradition I'm definitely starting this year is an advent calendar! I've just got to come up with the perfect one to make! I really love the idea of counting down the days with some education for my sweet daughter! Here are a few tutorials I've seen for them, but none I've fallen head over heals in love with, yet.
 |
| Well, I may have fallen in love with this one made with the FABULOUS Silhouette CAMEO that I want so badly! by: Amy Totty |
 |
| We just might end up with this one from makoodle.com |
Wednesday, November 16, 2011
It's the little things
I dont have a big elaborate post to write today. Just wanted to share a bright moment from my week. My wonderful husband works for a local car dealership in the service department. He recently took my Explorer in to have some repairs and maintenance done on it. He decided to get really sweet and left me a little note on that little reminder sticker they put in your windshield.
He often says "oh schweetie" to me out of the blue, so it was pretty special that he was thinking of me when he did it! Love Him!!
He often says "oh schweetie" to me out of the blue, so it was pretty special that he was thinking of me when he did it! Love Him!!
Tuesday, November 15, 2011
Tuesday Tip: Chicken and Rice
This recipe was originally posted on my old Not Just a Little Fat blog.
This Chicken and Rice is very filling and tastes like its unhealthy. I swear it tastes just like chicken and dumplings without all the fat of the dumplings. The recipe is approximate measurements. Be sure to check often, if it's looking too thick then add a little water to the mix. I didn't have any stock or broth on hand when I made it, so I decided to just make my own by boiling the chicken and vegetables for a bit before adding the rice. If you're short on time then buy a low sodium Chicken Broth and substitute for the water. You can also add one cube of chicken bullion to the water instead of the salt, pepper and poultry seasoning. A Serving is about 1 cup.
I wrote this one before committing to going as all natural as possible. I haven't checked some of the ingredients on labels, so be sure you do before cooking.

Wednesday, November 9, 2011
The Reno.
I cannot believe I haven't posted about our renovations, yet! It's consuming our lives in so many ways, but I'm so excited!
When we moved to Texas 5 years ago, we were so fortunate that my hubby's family built an apartment for us. Of course, that happened quite a while before kids came into the picture, so it was truly never meant to house more than just the hubs and I. It's got a three room layout (great room, bedroom, bathroom/washroom combo) and we've managed to fill it up! There is literally furniture along every wall. Hey, it's not hard to do with all the necessary furniture, drums, my crafting area and a three year old diva. We are a little more fortunate than some in that we have 777 sq feet, but the layout of the place is not the greatest use of space. And, now, Lilly really should be getting into her own room ASAP!
So, we are adding on! God has worked things around to allow us to be able to build into the garage our apartment is built onto! We are adding three new rooms, and we will eventually be redoing the rooms we already have! The rooms we are adding are 2 bedrooms and an office for me!
The rooms we currently have are laid out in such a way that in order to get to the bathroom from the great room, you have to walk through the bedroom. We are remedying that situation by putting our bedroom in the smaller of the two new rooms. Lilly will be getting the larger room. That sounds kinda backwards huh? Seriously, though all we do is sleep and...well...you know ;) in our room, so it makes sence for her to have the larger room for all of her toys, etc. What is now our bedroom will become a living room. The great room (really just a kitchen and living room) will become a larger kitchen, dining room, and drum room (though I really hope that is only temporary :)). I'm very excited to get to eat family dinners around the table again!
I'm totally going to get some pics and do a write up on each of the rooms soon. I'll make sure to include all of my inspiration, and make lots and lots of how-tos! I can't wait to show you all my office! It's going to be amazing!! Just thinking about it makes me so very thankful for an amazing God that's provided me with an amazing husband who works 12 hour days then comes home and works on the addition so that I can have my dream! I mean seriously, how many 25 year old girls get to have their own studio space? I'm so blessed :) Y'all totally need to follow along! Y'all are gonna gt so many tips from this, I promise!! I just gotta pass on the blessings, ya know? :)
Urgent call to prayer!
My aunt has always been like my second mom. Today something horrible happened to her.
I've not got all the details, but according to the police, it appears that someone broke into her house. She has multiple gunshot wounds and had to pull herself to the phone to call 911. Please, please pray for her and my family. She's stable but has been flown to a major hospital in her area. I'll give more details as I learn them.
I've not got all the details, but according to the police, it appears that someone broke into her house. She has multiple gunshot wounds and had to pull herself to the phone to call 911. Please, please pray for her and my family. She's stable but has been flown to a major hospital in her area. I'll give more details as I learn them.
Tuesday, November 8, 2011
Tuesday Tip: Super Cutie Caplet Crochet Pattern
This pattern was originally posted over at my old Lilly Bunns blog. I hope you enjoy!
It's been a VERY long time since I made the super cutie Capelet, but I'll try my best to write it out. I'm so sorry for the delay in getting it done. Life is quite crazy with a 2 year old! Please let me know if you find a mistake. I'll do my best to correct it as soon as possible. Pay close attention on the increasing rows. I suppose the correct spacing isn't super important on rows 4-5 as long as you increase in the first and last stitches and get the correct amount of increases in between. I'll mark the amount of increases at the end of each row. This is a great size for toddlers. I made it for my daughter when she was 18 mo, and it's almost too small at almost 3 (she's the size of a 4 year old lol).

Abreviations used:
Ch: Chain
DC: Double crochet
SC: Single Crochet
ST: Stitch
Guage: 2 rows, and 3 stitches= 1 inch
Hook: G hook
Ch 37
Row1: Insert hook into third ch from hook. 1 DC in each chain. (34 st)
Row 2: Ch.3 and turn 1 DC in each ST. (34 st)
Row 3: ch 3 and turn. 1 DC in same ST. *1 dc in next st, 2 DC in next st** repeat from * to ** to the end (54 st)
Row 4: Ch 3 and turn. DC in same st.; 1 DC in next 3 st.; 2 dc in next st.; 1 dc in next 9 st.; 2 dc in next st; 1 dc in next 9 st.; 2 dc in next st; 1 dc in next 7 st; 2 dc in next st; 1 dc in next 9 st; 2 dc in next st; 1 dc in next 9 st; 2 dc in last st. (58 st) 7 inc
Row 5: Ch 3 and turn. dc in same st.; 1 dc in next 9 st.; 2 dc in next st; 1 dc in next 10 st; 2 dc in next st; 1 dc in next 5 st; 2 dc in next st; 1 dc in next 6 st; 2dc in next st; 1 dc in next 6 st; 2 dc in next st; 1 dc in next 7 st; 2 dc in next st; 1 dc in next 8 st; 2 dc in last st. (66 st) 7 inc
Row 6: (this is last regular dc row) Ch 3 and turn. 1 dc in each st. (66st)
Row7-9: (shell stitch rows) Ch 3 and turn. 2 dc in same st. Ch1 skip 4 st; *4 dc in next st., ch1, skip 4 st** repeat from * to ** 11 times, 3dc in last st. (12 total scallops, not including the half scallops on the end.
Ch 1 and turn. Now you will SC up the side. When you get to the corner about to round to the top put 2 SC. Continue SC across the top doing the same at the next corner, then work down the other side. Tie off and weave in the ends of the yarn. You will not SC across the bottom scalloped edge!!!
Add a ribbon into the holes at the top of the first row! enjoy!
To increase the size, chain more at the beginning, add 1 increase to each row, add one row of increase, and 1 row of shell st. until it's the length you want.
Monday, November 7, 2011
The Craft Bug
It seems like I just go from one obsession to the next, and this week is no exception! The craft bug had totally hit! I don't know if it's because this week is the first in a month that I don't have to do anything!
I've got a whole week of cleaning and crafting planned! First up is a cute scarf for Lilly! It's inspired by a trellis with flowers climbing it. I'm very excited about it and you'll get to benefit from another EASY crochet pattern by me! Next up are some Christmas presents. I'm not entirely sure what they will be, but whatever they are they will be fabulous!
For my photography stuff I've got two props that need to be made! First, a paper mache egg to post newborns in, and a bird's nest. They are gonna be super cute!!
And last but not least is something for my house! I'm gonna be turning some wooden pallets into end tables. I'm also gonna try to fit in a dining table re-do from a found table! I'm so excited about the tables, I can't stand it!
Of course, I'm gonna blog about it all, and share my process! What are you gonna make this week?
Tuesday, November 1, 2011
Tuesday Tip: Super Cutie Cloche Crochet Hat Pattern
This pattern was originally posted at my old Lilly Bunns Blog. I hope y'all enjoy!
This adorable hat is my very first crochet pattern! I Love how easy it is and quick! I'm a fairly fast crocheter and it takes me about an hour to make, barring any interruptions from my cutie pie lol. It fits a 12-18 month old easily. It can be made bigger or larger by changing your hook size. To go from baby size to child size you can add another increase row. Please let me know if you find any problems with the pattern. This is my first time writing one out!
Materials:
Caron Simply Soft yarn
G (4 mm) hook
Gauge:
Three rows= 2 "
3 stitches= 1"
Skill Level: Intermediate
Abreviations:
DC: Double crochet
Ch: Chain
SC: Single Crochet
HDC: half double crochet
3tog: 3 Together (explained below)
Special Stitches
3 Together (3tog): Yo, insert hook into the stitch, yo and draw up loop. Yo and pull through two loops. Yo and insert hook into the SAME loop, yo and draw up loop. Yo and pull through two loops. Yo and insert hook into the SAME loop, yo and draw up loop. You and pull through two loops. Yo and pull yarn through all 5 loops on the hook.
Round 1: Ch. 4, slip stitch in first chain forming ring, ch. 3 (counts as first dc here and throughout) 11 DC into the ring. Join with slip stitch to first stitch (12 dc)
Round 2: Ch. 3, 1 DC in same stitch, 2 DC in each stitch around, join with Slip stitch to first stitch (24 DC)
Round 3: Ch. 3, 1 DC in same stitch, 1 DC in next stitch *2 DC in next stitch, 1 DC in next stitch** Repeat from * to ** all the way around. Join with Slip Stitch to first stitch (36 dc)
Round 4: (last increasing round) Ch 3, 1 DC in same stitch, 1 DC in next 2 stitches *2 DC in next stitch, 1 DC in next 2 stitches** Repeat from * to ** all the way around Join with slip stitch to first stitch (48 DC)
Rounds 5 and 6: ch 3, 1 dc in next stitch and each stitch around (48 DC)
Round 8: ch 1, 1 HDC in next stitch and each stitch around (48 HDC)
Round 9: Ch 3, DC 2tog in same stitch, chain one, *Skip next stitch and dc 3tog, Ch one** repeat from * to ** all the way around. join with slip stitch to first stitch.
Round 10: Ch 3 and turn work, DC 2tog in ch 1 space, ch 1, *Skip next stitch and dc 3tog in next ch 1 space, Ch one** repeat from * to ** all the way around. join with slip stitch to first stitch.
Round 11: Ch 3 and turn work, DC 2tog in ch 1 space, ch 1, *Skip next stitch and dc 3tog in next ch 1 space, Chain one** repeat from * to ** all the way around. join with slip stitch to first stitch.
 |
| Hat and Caplet Set |
Materials:
Caron Simply Soft yarn
G (4 mm) hook
Gauge:
Three rows= 2 "
3 stitches= 1"
Skill Level: Intermediate
Abreviations:
DC: Double crochet
Ch: Chain
SC: Single Crochet
HDC: half double crochet
3tog: 3 Together (explained below)
Special Stitches
3 Together (3tog): Yo, insert hook into the stitch, yo and draw up loop. Yo and pull through two loops. Yo and insert hook into the SAME loop, yo and draw up loop. Yo and pull through two loops. Yo and insert hook into the SAME loop, yo and draw up loop. You and pull through two loops. Yo and pull yarn through all 5 loops on the hook.
Round 1: Ch. 4, slip stitch in first chain forming ring, ch. 3 (counts as first dc here and throughout) 11 DC into the ring. Join with slip stitch to first stitch (12 dc)
Round 2: Ch. 3, 1 DC in same stitch, 2 DC in each stitch around, join with Slip stitch to first stitch (24 DC)
Round 3: Ch. 3, 1 DC in same stitch, 1 DC in next stitch *2 DC in next stitch, 1 DC in next stitch** Repeat from * to ** all the way around. Join with Slip Stitch to first stitch (36 dc)
Round 4: (last increasing round) Ch 3, 1 DC in same stitch, 1 DC in next 2 stitches *2 DC in next stitch, 1 DC in next 2 stitches** Repeat from * to ** all the way around Join with slip stitch to first stitch (48 DC)
Rounds 5 and 6: ch 3, 1 dc in next stitch and each stitch around (48 DC)
Round 8: ch 1, 1 HDC in next stitch and each stitch around (48 HDC)
Round 9: Ch 3, DC 2tog in same stitch, chain one, *Skip next stitch and dc 3tog, Ch one** repeat from * to ** all the way around. join with slip stitch to first stitch.
Round 10: Ch 3 and turn work, DC 2tog in ch 1 space, ch 1, *Skip next stitch and dc 3tog in next ch 1 space, Ch one** repeat from * to ** all the way around. join with slip stitch to first stitch.
Round 11: Ch 3 and turn work, DC 2tog in ch 1 space, ch 1, *Skip next stitch and dc 3tog in next ch 1 space, Chain one** repeat from * to ** all the way around. join with slip stitch to first stitch.
Round 12: Ch 3, 1 dc in next stitch and each stitch around (48 DC)
Round 13: (scalloped edging) Ch 1, SC in next stitch, Chain four, skip next stitch, *SC in next 2 stitches, chain four, skip next stitch** Repeat from * to ** all the way around.
You are Finished!! This hat looks absolutely adorable with a Crocheted flower or a cute hair bow attached!
I'll be posting the caplet pattern sometime in the next few weeks!
Feel free to sell items created from this pattern, but please do not claim it as your own, or sell the pattern itself. Please mention that the pattern comes from Lilly Bunns Boutique in your listing.
Feel free to sell items created from this pattern, but please do not claim it as your own, or sell the pattern itself. Please mention that the pattern comes from Lilly Bunns Boutique in your listing.
Tuesday, October 25, 2011
Silhouette CAMEO Giveaways!
I hope I didn't trick you with that title! I'm not giving one away. This blog just isn't that popular, yet :)
I don't know if you've heard about the Silhouette, but blog after blog I've read has projects to do with it. So of course, I had to see for myself what it was all about. I searched it yesterday and OMG I have to get one! There's SO many things you can do with it! I would literally like to have it to do everything it can do.
If you follow me on Pinterest, It's no secret how much I LOVE vinyl art, now. Not to mention all of the projects I can use it as a stencil! How cool would it be to have this in your room!

I used to be an avid scrapbooker, but with no space to keep all of the embellishments, I had to give up doing it. With the Silhouette, I can make the designs I need as I need them! No more having boxes and boxes of scrapbooking supplies!

Two of the coolest things it can do by far, are the rhinestone templates and the temporary tattoos. Seriously how Cool is that!
I know, my blog just isn't *there* yet to be one of the ones chosen to do a giveaway for the CAMEO. But in my desire to have one and have it soon, I'm entering each and every giveaway I find!. I thought I'd save you the trouble and make a list of everywhere I'm entering!! Many of them even have a coupon code, so even if you don't win, you can still get a little savings!
I used to be an avid scrapbooker, but with no space to keep all of the embellishments, I had to give up doing it. With the Silhouette, I can make the designs I need as I need them! No more having boxes and boxes of scrapbooking supplies!
Two of the coolest things it can do by far, are the rhinestone templates and the temporary tattoos. Seriously how Cool is that!
I know, my blog just isn't *there* yet to be one of the ones chosen to do a giveaway for the CAMEO. But in my desire to have one and have it soon, I'm entering each and every giveaway I find!. I thought I'd save you the trouble and make a list of everywhere I'm entering!! Many of them even have a coupon code, so even if you don't win, you can still get a little savings!
That's pretty much all I could find, for now. I'll take another crack at it later. Crossing my fingers and saying a prayer for me and you to win one!!
Leaving a Legacy
It occuenrred to me the other day as I was baking of just what a great legacy has been left for me. Certainly my family is not perfect, not by a LONG shot, but I was certainly raised in such a way that I was left one amazing legacy. I have such great examples of how to be a woman of God, and how a Godly family operates, it's pretty amazing.
One legacy that I've often thought about, and praised God for, is that not one single marriage in my immediate family (grandparents, first cousins that I see the most, parents) has ended in divorce. In fact, both sets of grandparents were married for at least 50 years, my parents and aunt & uncle married for over 25 years, my closest cousin married for 10. Each of them has a God-centered marriage and are going strong. I love to sit with my Maw-Maw and listen to stories from "back in the day," here lately I can't seem to have a conversation with her without her saying "I can't wait to go be with my sweet-heart." My paw-paw died when I was in the 5 grade. It breaks my heart to hear her say that, cause I want to keep her here with me forever, but isn't that like the sweetest thing you ever heard? Growing up, I got to watch my parents have the most amazing marriage. It's definitely something to aspire to.
My parents set such a great example in how to raise a kid. They certainly made their share of mistakes, but I don't think anyone could have had a better childhood. We always had what we needed. We even got a lot of what we wanted. We knew to be thankful for what we have. On more than one occasion strangers have gone out of their way to inform them that my brothers had great manners. When we did something wrong, they didn't compromise their morals or ours, they always stood their ground. When my brother had his accident and became paralyzed, my mom dropped everything to go take care of him for MONTHS in the hospital. It's something that when contrasted with other people's raising, I'm just so immensely grateful.
In beginning to notice the legacies that were left for me, I started thinking about the legacy I want to leave for my daughter and all who come in contact with me. I want my kids to grow up exuding the fruit of the Spirit. I pray often that Jesus shines so brightly through me that people come up to me to ask if I'm a Christian. I get that from my Grandfather. He's been a preacher for as long as I can remember and on the job delivering news papers to a convenience store, a lady came up to him, asked if he was a pastor, and asked that he pray for her once he confirmed that he was. I want to be the loving wife that if I die before my husband does, he can't wait to die to join me in heaven. I want my kids to look back and say, "man, I had one awesome mama." I want everyone I come in contact with to feel loved once I leave them. I want everyone to want a relationship with Jesus. I want people to know to not follow the teachings of their church or some televangelist, I want them to seek God's word and walk with the guidance of the Holy Spirit. I want people to know that Jesus came, died on the cross and rose from the dead, in order to have a close, personal relationship with you.
Thursday, October 20, 2011
Me LOVES My Supplements!
As most of you know, I've been struggling to lose the weight I gained after being healed of my anorexia. As of now, I'm about 50 lbs overweight. I've sometimes wondered how even when I do everything perfectly, I just can't lose the weight. A friend finally suggested it might be Thyroid related.
I was like DUH! Most people are actually iodine deficient. When she suggested that might be my problem, I got really excited. I know, excited to have been "diagnosed" but I was just happy to have a reason! I was diagnosed with goiter just before I got married, but it was never discovered why. I looked up the symptoms of iodine deficiency/hypothyroidism and low and behold I had all but 3 symptoms.
Now, most people would go to the doctor, get diagnosed, and go on medication for the rest of their life. Not me. See we made the switch to being holistic recently, we treat the whole body, not just the symptoms. Don't get me wrong, modern medicine definitely has it's place. I knew that the most likely cause of having hypothyroidism is not having enough iodine. So what did I do? I went and got me an iodine supplement (kelp). I've already lost 5 lb, by doing nothing different than taking the kelp. I feel immensely better. I'm also taking a prenatal vitamin (best vitamin for a woman to take as per a medical doctor), vitamin E oil to help my body break down the sellenium I ingest, and an acidophilus supplement to keep my body well balanced.
I cannot begin to tell you how much of a difference this has made. We have also added WAY more veggies into our diet, but that's a whole other post. The point of this? Just check to see if there's any type of supplement (or better yet a food) you can use to treat whatever ails you. Chances are it will not just treat the one symptom you're having, but cure your entire system.
"If we could give every individual the right amount of nourishment and exercise, not too little and not too much, we would have found the safest way to health"--Hippocrates
“Let food be thy medicine and medicine be thy food”--Hippocrates
Wednesday, October 19, 2011
I'm Featured! SAHM of Etsy
Etsy has this great resource called teams. I'm a member of the SAHM of Etsy Team! I actually head up the blog for them. Seriously, though there are several amazing ladies who help me immensely with it!
Each Wednesday over there, we feature one of the active team members. You don't get picked if you don't participate, so it's really quite the honor! It's a great motivation for team members to get/stay active!
This week's featured shop is ME!! Yay!! You can see the post here, but I'm also gonna put it down here. Don't forget to go check out the team blog and follow! We post tutorials, shop advise, beautiful team treasuries and have a link party every Friday!
Tuesday, October 18, 2011
Tuesday Tip: Sweet Potato Fries Recipe
This is one of our favorite recipes around here! Even my veggie-hating hubby loves them! Here's just a few tips to get you started. Be sure not to cut the slices over a 1/4" thick. They need to be uniform slices. Also, make sure to leave a good bit of space around the potatoes on the pan. They steam a lot and need the room so they don't just steam each other. You also will need to watch them closely as they can burn easily. OK, that's it for the tips! Happy cooking!
 |
| As always, click and print to add this recipe to your Recipe Box! |
Wednesday, October 12, 2011
My Lazy Girl's Money Saving Cleaning Tips
Ok, my friends and family are laughing their heads off now! I'm not the world's greatest housekeeper by any means. There's little more that I hate as much as cleaning. Trust me, a person who is fairly lazy and hates to clean is the best person to get cleaning advise from. Wanna know why? It's all about making it easier. And since my grocery budget must also include my cleaners, I'm looking for a way to make cleaning as inexpensive and still environmentally safe as possible.
 |
| Image from green-house-cleaning-tips.com |
Tuesday, October 11, 2011
Tuesday Tip: Blueberry Muffin Recipe
These seriously have to be the best blueberry muffins I've ever had! The batter is just the perfect consistency and the topping is to die for! This recipe guarantees you 12 big, bakery sized muffins every time!
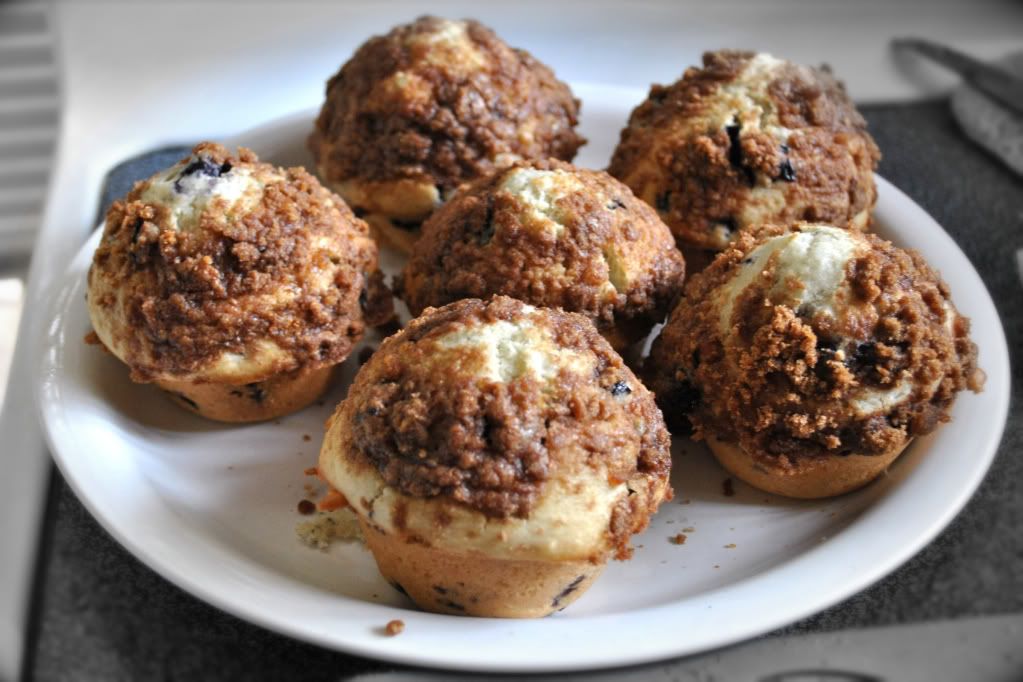 |
| Picture does not do these justice! The best looking ones had already been eaten before I could snap a picture! |
Saturday, October 8, 2011
Making customized blog tabs for your Blogger Blog
I used to see so many blogs with really cool page buttons for their blog. But Blogger's standard buttons are just so boring! I searched and searched for a tutorial to change them, but really didn't even know what search terms to use. I eventually found a great YouTube tutorial that showed me how to do it. Puglypixel uses Photoshop, so I thought I'd write a post on how I do it with GIMP.

Friday, October 7, 2011
Crochet Ruffled Scarf Pattern
With fall here and it starting to get cool outside, I thought I'd pull out this pattern from the old Lilly Bunns Blog! This scarf is super duper cute, and I've had TONS of compliments on it. And the pattern couldn't be any simpler! I've made this one pretty long, but you could make it however long you want.

Abreviations:
Ch: Chain
DC: Double Crochet
TC: Triple Crochet
sl st: Slip st
hook: J
Gauge is not important.
Ch 103
Row 1: 1 dc in each stitch. 6 dc in the last (106)
Row 2: Instead of turning and going up, you'll work on the "bottom" in the chain st. 1 DC in each st, 6 dc in last st. sl st to join (At this point it will look like a super long oval) (106)
Row 3: Chain 4, 5 TC in next 100 st. skip 3 st and sl st Cut yarn and tie off.

Pin It
Wednesday, October 5, 2011
This is why I love natural remedies
I had a head and ear ache all day yesterday, but just suffered through it until about 3 am this morning. The pain was so severe I couldn't get to sleep. I broke down and took conventional medicines. They did relieve the pain for a little while, but when I woke up just a few short hours later it was back with a vengeance.
After a google search on how to best use some remedies I'd heard of, I got to work in my kitchen. That's right no trips to the doctor or the pharmacy. Most of what I needed was right there at home. I, unfortunately, didn't have any whole onions or garlic, so I racked my brain with to find a way to get the healing benefits of both into my ear. I decided to put some of the chopped onion and garlic I have on hand in a little organic grape seed oil. I heated it for about 30 seconds in the microwave and then allowed it to cool to body temperature. I then took a sterilized dropper and put 3 drops in my ear and dipped a small piece of a cotton ball into the mixture and put that in my ear as well. The relief was nearly immediate! In an effort to help it work a little better I also massaged the area. I will repeat this every few hours.
I will write another post another day on why we choose to be a homeopathic as possible. I'm by no means over the ear infection as this was just the first time for me to treat it, but I am allowing my body to do as God designed it to and heal itself! (which coincidentally will boost my immune system and reduce my chances of getting the same thing again in the future.)
Monday, October 3, 2011
Tutorial: Felt Flower Fridge Magnets
It's still February, but spring is upon us down here in the Houston area, and I'm in full blown garden and flower mode! I'm also all about magnets since we have very few of them here at the house, and most are really ugly. So I decided to combine the two and make some felt flower fridge magnets. I found a few flower templates online, and got to work!

Tutorial: How to Work "the Twitter"
I must confess, after originally writing this post for my Lilly Bunns blog I haven't gotten much better about using twitter. I'm getting better, though. Hopefully this little guide will help you out too!

Let God Work
I've always struggled with trying to control everything. Everything from my husband, to my house, to just EVERYTHING! I can't tell you how difficult it is for me to let someone else drive a car I'm riding in! This same attitude is reflected in my relationship with God. I'm always wanting to be the one to cause change in my life. God has taught me so much about my attitude, and allowing Him to do the work in me.
Recipe: Yummy Turkey Meatloaf
I LOVE this meatloaf! It's the closest I've ever come to a "real" meatloaf. The texture is great, and there's all
sorts of yummy goodness inside. The ground turkey takes just a little of the fats away, and whole wheat bread and oats make for a great addition of complex carbs!
Tutorial: Pattern Weights

There's nothing I hate more than pinning a pattern and cutting out the fabric when I'm doing a project. I absolutely love my rotary cutter and mat. It saves me so much precious time! If you have yet to take the rotary leap, I highly recommend you jump in as soon as you can! I promise, you'll never look back! It's also great for those with bad hands!
Welcome, Welcome, Welcome...
To the greatest show on earth. OK, OK I know I'm not that interesting, but there is a pretty crazy show going on behind this computer screen! At least it feels like craziness! I'm not only a wife and stay-at-home-mom, I'm making an attempt to run two small businesses and blog about it all.
If you've come here from Lilly Bunns Boutique blog, or Not Just a Little Fat, then WELCOME to the new digs! I hope you all enjoy it here! I maybe owe you a little explanation for doing away with the other blogs (or you don't care and that's OK too). I wanted a place where I can write about everything that interests me, not just weight loss, or crafting. Having two blogs to keep up with just two things I'm interested in, just wasn't a good fit for me. Don't worry, I'll be bringing the interesting posts over here from there! I'll also be leaving both blogs active so you can still go straight to the post with the links you're used to.
You might be saying "Self, what in the world does the name of the blog mean?" Or, again, you might not care and are just happy to be here, hopefully; cause you just might be thinking you're never coming here again (I really hope you're not) There are sooooooooo many words I could use to describe myself and the purposes of this blog, but I really think those 3 sum me up almost to a T.
Your next question is probably "she's crunchy?" Crunchy is a sort of nick name that "green living" people have gotten. I'm not so sure of the etymology, but it's something about hippies eating crunchy granola. I will write a post later on why I'm going as all natural as possible.
Now onto what you will find in this blog. It will just be about my life and the things that interest me. Everything from crafts and decorating, to photography, to politics and Christianity. I might even throw in a few conspiracy theories every now and again (that's where the crazy comes in). I'll share everything from the struggles of marriage to the joys of mother hood. So grab a cup of coffee and plop down in front of your computer and follow along in my Crunchy, Crafty, and Crazy world!
 |
| This is my grainy iPhone pic, I was bored and it was a good hair day . |
If you've come here from Lilly Bunns Boutique blog, or Not Just a Little Fat, then WELCOME to the new digs! I hope you all enjoy it here! I maybe owe you a little explanation for doing away with the other blogs (or you don't care and that's OK too). I wanted a place where I can write about everything that interests me, not just weight loss, or crafting. Having two blogs to keep up with just two things I'm interested in, just wasn't a good fit for me. Don't worry, I'll be bringing the interesting posts over here from there! I'll also be leaving both blogs active so you can still go straight to the post with the links you're used to.
You might be saying "Self, what in the world does the name of the blog mean?" Or, again, you might not care and are just happy to be here, hopefully; cause you just might be thinking you're never coming here again (I really hope you're not) There are sooooooooo many words I could use to describe myself and the purposes of this blog, but I really think those 3 sum me up almost to a T.
Your next question is probably "she's crunchy?" Crunchy is a sort of nick name that "green living" people have gotten. I'm not so sure of the etymology, but it's something about hippies eating crunchy granola. I will write a post later on why I'm going as all natural as possible.
Now onto what you will find in this blog. It will just be about my life and the things that interest me. Everything from crafts and decorating, to photography, to politics and Christianity. I might even throw in a few conspiracy theories every now and again (that's where the crazy comes in). I'll share everything from the struggles of marriage to the joys of mother hood. So grab a cup of coffee and plop down in front of your computer and follow along in my Crunchy, Crafty, and Crazy world!
Subscribe to:
Posts (Atom)